To create a virtual reality experience with Unity, you need to install Unity, create a project, configure project settings, download the Unity XR toolkit, and set up XR origin and controllers. With Unity, you can build engaging games, tell interactive stories, and transport people to new worlds by building VR experiences.
Unity supports most popular VR systems including Oculus Rift, Gear VR, Google Daydream, Cardboard, and Steam VR/HTC Vive. We will give you step-by-step instructions on how to create a VR experience with Unity. We will cover topics such as Unity VR plugin manager, Unity project layout, XR interaction toolkit installation, creating VR rig, fixing the floor level, and testing.
With these instructions, you will be able to build complex multiplayer experiences with advanced performance tools and achieve amazing graphics with flexible graphics pipelines.
Credit: www.searchmyexpert.com
Getting Started
Learn how to create your own virtual reality experience with Unity by following these helpful tutorials. From setting up a new project to importing the Unity XR Interaction Toolkit package, these videos will guide you through creating a basic VR scene, adding VR movement, and testing your app.
With Unity’s multiplatform support and advanced performance tools, you can build engaging games and experiences for a variety of headsets.
Getting Started Virtual reality has emerged as a fast-growing industry with a massive potential to provide immersive and interactive experiences that blur the line between reality and simulation. Unity is one of the best virtual reality game engines that provide developers with an easy-to-use toolset for crafting incredible VR experiences. If you are a beginner looking to create your first VR experience, then this guide is your perfect companion. Let’s get started and explore how to create a virtual reality experience with Unity using simple steps. Requirements The first step in creating a VR experience with Unity is to ensure that your machine meets the minimum requirements. Before installing Unity, you need to check your system specifications to avoid any potential glitches. You need a Windows machine with at least Windows 7, Intel Core i5 or equivalent processor, 8GB of RAM, and a graphics card that supports DirectX 11 or higher. For Mac, you need macOS 10.12+ and a compatible graphics card. Make sure you have a reliable internet connection, as Unity is a large software suite that requires a download of a few gigabytes. Installation Once you have checked the system requirements and confirmed that everything is in order, the next step is to install Unity. Head over to the Unity website and download the latest version of Unity Hub. Follow the on-screen instructions and install Unity Hub. After installation, open Unity Hub and create an account or sign in if you already have one. With Unity Hub, you can manage multiple Unity Editor versions, install additional components, and create new Unity Projects with ease. Unity Editor Overview The Unity Editor is a potent toolset that provides a comprehensive and intuitive user interface for creating VR experiences. After installing Unity and Unity Hub, launch the Unity Editor and get familiar with the interface. Unity Editor consists of various windows, including the Scene View, Game View, Hierarchy Window, Inspector Window, and more. The Scene View displays the 3D environment of your VR experience, while the Game View shows a preview of the same environment from the user’s perspective. The Hierarchy window lists all the game objects in the scene, while the Inspector window displays their properties. Project Settings Configuration Configuring Unity project settings is essential to ensure a smooth working experience. Click on ‘New’ in Unity Hub, select a project name and location, then choose the 3D template. Once the project opens, navigate to the ‘Edit’ menu, click on ‘Project Settings,’ and customize the project’s configuration to suit your needs. For VR experiences, you need to set the ‘Player Settings’ to enable VR support, select the target platform, and specify the input system configuration. In conclusion, creating a VR experience with Unity is a thrilling journey that requires patience, creativity, and persistence. By following the steps outlined above, you can start your VR project with confidence and create incredible experiences for users.
Unity Xr Toolkit
Creating an immersive virtual reality experience with Unity is made possible with the Unity XR toolkit. With its advanced performance tools, flexible graphics pipelines, and multiplatform support, Unity allows developers to build engaging VR games and interactive experiences.
Unity XR Toolkit: Download and Installation The Unity XR Toolkit is a powerful tool that allows developers to create immersive virtual reality experiences. The first step to getting started with the Unity XR Toolkit is to download and install it. Fortunately, this process is relatively straightforward. To download the Unity XR Toolkit, navigate to the Unity website and click on the “Downloads” section. From there, you can select the version of Unity that you want to use and find the XR Toolkit package. Once you have downloaded the package, you can import it into your Unity project. XR Origin The XR Origin is an important part of the Unity XR Toolkit. It is the point in 3D space where the user’s head is located. This is important because it allows developers to position virtual objects and UI elements in the right location relative to the user’s head. To set up the XR Origin, you need to create a new GameObject in your Unity project and attach the XR Rig component to it. This will create a hierarchy of objects that represent the various parts of the XR system, including the camera and the tracking space. XR Controllers Finally, the Unity XR Toolkit includes support for XR controllers, which are used to interact with virtual objects in the scene. There are several different types of XR controllers available, including those for specific VR systems like the Oculus or the HTC Vive, as well as generic controllers for use with other systems. To set up XR controllers in your Unity project, you first need to add the appropriate input module to your project. This will enable support for the specific type of controller you are using. From there, you can set up interactions between the controller and virtual objects in your scene. Overall, the Unity XR Toolkit is an essential tool for developers looking to create immersive virtual reality experiences. By following these steps, you can set up your Unity project to work with the XR Toolkit and start creating amazing VR content.
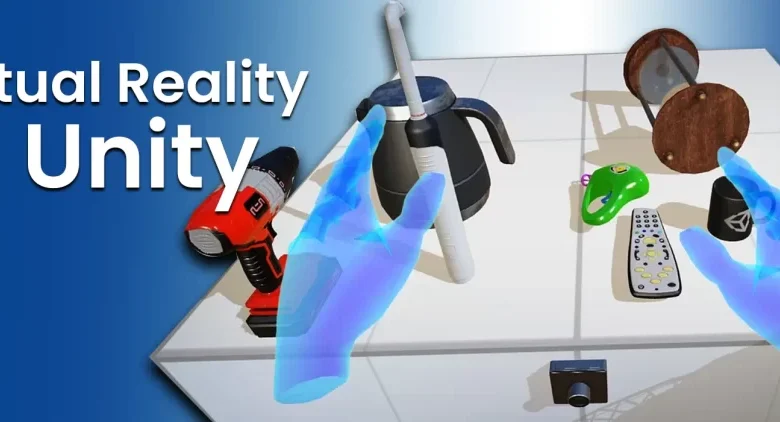
Vr Interaction Toolkit
Create a virtual reality experience with Unity using the VR Interaction Toolkit. This toolkit allows for easy creation of interactive VR scenes, including XR controllers and movement. With Unity’s multiplatform support and advanced performance tools, it’s easy to reach most headsets and create engaging VR experiences.
If you want to create a truly immersive virtual reality experience using Unity, you need to take advantage of the VR Interaction Toolkit. This powerful toolkit provides you with the tools you need to create highly interactive VR environments that users will love. In this post, we’ll take a look at how you can use the VR Interaction Toolkit to create your own VR experiences. First things first, let’s discuss how to install the toolkit.
Installation
To get started with the VR Interaction Toolkit, you’ll need to download it from the Unity Asset Store. Simply search for “VR Interaction Toolkit”, then click the “Download” button to get started. Once the download is complete, you can import the package into your Unity project and start creating your VR environment.
Creating Vr Rig
The VR Interaction Toolkit includes a feature called the “VR Rig”, which is essentially a prefab that you can use to quickly add VR support to your Unity project. To use the VR Rig, simply drag and drop it into your scene and attach your camera to it. This will allow you to move your virtual camera with your head movements in the real world.
Fixing The Floor Level
When designing your VR experience, it’s important to make sure that the floor level is set correctly. This will help prevent users from feeling disoriented or sick while in the VR environment. To fix the floor level, you need to use the VR Interaction Toolkit’s “XR Rig” GameObject. To do this, select the XR Rig in the hierarchy and make sure that the “Device Name” field is set to the VR device you’re using. Then, move your VR headset to the floor level you want to set, and press the “Set Floor Level” button in the XR Rig component. This will align the in-game floor with your real-world floor, creating a more immersive experience for your users. With these steps, you can create an engaging, interactive VR experience with Unity using the VR Interaction Toolkit. By taking advantage of these powerful features, you can create a world that users will want to explore again and again.
Credit: www.blockchain-council.org
Designing Your Vr Experience
Learn how to create a virtual reality experience with Unity by following tutorials and installing Unity XR Toolkit. Use the process of designing applications and wireframes to develop user personas, conceptual flows, and an interaction model to build engaging games, transport players to new worlds and tell interactive stories with advanced performance tools.
Unity is a great platform for mobile VR development, supporting Oculus Rift, Gear VR, Google Daydream, Cardboard, and Steam VR/HTC Vive.
Designing Your VR Experience Creating a virtual reality experience can be a daunting task if you don’t know where to start. Fortunately, designing your VR experience is not too different from designing other digital products. To get started, you’ll need to develop user personas, conceptual flows, wireframes, a VR prototype, and an interaction model. Let’s dive deeper into each of these design phases.
User Personas
Developing user personas is a crucial first step in designing any digital product. It helps you understand your target audience and their unique needs, behaviors, and pain points. When creating user personas for your VR experience, consider factors such as age, gender, interests, and technical proficiency. These personas will help guide your design decisions and keep your experience user-centered.
Conceptual Flows
Once you have a clear understanding of your user personas, it’s time to create conceptual flows. A conceptual flow is a visual representation of the user’s journey through your VR experience. It helps you identify the key touchpoints where users engage with your product and ensures a cohesive and seamless experience. When creating conceptual flows for your VR experience, keep in mind the user’s context and the environment they will be in while using the experience.
Wireframes
Wireframes are a simplified visual representation of your VR experience. They allow you to explore different design layouts and user flows without the distractions of colors or graphics. When creating wireframes, focus on the layout and structure of your VR experience. Identify the key elements such as buttons, navigation, and interactions. By creating wireframes, you can ensure that your VR experience is easy to use and intuitive.
Interaction Model
The interaction model is the backbone of your VR experience and identifies how users will engage with your product. It defines the input and output operations and how users will navigate through your experience. Ensure that your interaction model is centered on your user personas and the key touchpoints identified in your conceptual flows. By following these design phases, you can create a successful VR experience that engages users and meets their needs. Use Unity as your VR game engine to build engaging games, tell interactive stories, and transport people to new worlds. Now that you understand designing your VR experience, take the next step and start building your VR prototype.
Choosing An Engine For Vr
Choosing the right engine for your VR project is crucial to achieve an immersive experience. With Unity, you can create engaging games, interactive stories, or transport your users to new worlds. Unity offers multiplatform support, flexible graphics pipelines, and advanced tools to build complex multiplayer experiences.
Comparing Unity And Unreal
Creating a virtual reality experience requires a powerful game engine, and Unity and Unreal are two of the most popular options. Unity is known for its ease of use and supports multiple platforms, while Unreal is known for its high-quality graphics and advanced customization options.
Which One Should You Choose?
Choosing between Unity and Unreal depends on your specific needs. If you’re new to VR development or want a beginner-friendly option, Unity may be the better choice. However, if you require complex graphics and have experience in game development, Unreal might be the better choice.
Key Differences Between Unity And Unreal
Here are some key differences to consider when choosing between Unity and Unreal for your VR project:
- Unity is relatively easier to use and has a more user-friendly interface
- Unreal has advanced graphics capabilities and provides more flexibility in customization
- Unity supports more platforms, including mobile devices
- Unreal has more detailed documentation and a larger community for support
Ultimately, the choice between Unity and Unreal depends on what you want to achieve in your VR experience. With either option, you have the capability to create an immersive, interactive world that engages your users and transports them to new realities.
Credit: jumpgrowth.com
Testing And Debugging
Learn how to create a virtual reality experience using Unity by testing and debugging your app on PC, Mac, or Linux. Follow tutorials from experts on YouTube or Unity Learn and use VR plugins and tools like Unity XR toolkit, XR interaction toolkit, and more to build engaging games and complex multiplayer experiences with amazing graphics and multiplatform support.
Unity is a great choice for VR development, with easy C# coding language and compatibility with most popular VR systems.
Testing Your App On Different Devices
Testing is a crucial step in creating a successful virtual reality experience. It allows the developer to identify and fix any potential issues and make necessary changes for optimal performance. Testing on different devices is an important aspect of VR development as it gives a better understanding of how the user experiences your app. It is recommended to test your application on multiple headsets beyond your own, to ensure compatibility and usability across the board. Unity provides a detailed list of supported devices, which serves as a great starting point for testing across multiple platforms. For best results, consider testing on multiple devices to optimize for different screen resolutions, processing power, and other features.
Debugging Your Vr Experience
Once testing is complete, it’s time to turn your attention to debugging. Debugging is the process of identifying and resolving errors in the code. The debugging process not only addresses bugs but can also help optimize performance and improve the overall user experience. Unity provides a range of debugging options, from using the Unity Debug.Log function, which outputs messages to the console, to more advanced options like Unity Debugger. Additionally, other external debugging tools can be used to pinpoint more complex issues. These tools can help diagnose issues such as frame rate drops, control response, and other performance-related issues. In conclusion, testing and debugging are an essential part of creating a successful VR experience with Unity. By testing on different devices and debugging all potential issues, developers can create a unique and flawless virtual reality experience for the end-user.
Deploying Your Vr Experience
Learn how to create a virtual reality experience with Unity by following tutorials online. With Unity’s multiplatform support and advanced graphics and performance tools, you can build engaging games and tell interactive stories that transport people to new worlds. Follow the steps to install Unity and XR Toolkit, configure project settings, create an XR rig, and test your app on PC, Mac, or Linux with VR template.
Deploying Your VR Experience After building your VR experience with Unity, the next step is deploying it. Deploying your VR experience refers to the process of transferring your VR experience to a device that supports VR. This step is crucial to enable users to enjoy your VR experience fully. Fortunately, Unity provides various deployment options, making it easy to deploy your VR experience to various devices. Building Your VR Experience Before deploying your VR experience, you need to build it properly. Building your VR experience refers to the process of compiling your VR project into a format that can run on a specific device or platform. Unity enables you to build your VR experience for various platforms, including Oculus, Windows Mixed Reality, Android, and many more. You’ll need to choose the appropriate build settings and select the target platform to ensure that your VR experience runs smoothly on the target device. Deploying to Various Devices Once you have built your VR experience, it’s time to deploy it to various devices. Unity offers several deployment options, including direct device deployment, app stores (including Oculus and Steam), and webVR. Direct device deployment involves connecting your device via a USB cable and transferring the VR experience directly onto the device. App stores are more convenient for users as they can easily download your VR experience from the app store, making it accessible to a wider audience. Finally, webVR allows users to access your VR experience through a web browser, making it easily accessible without requiring the user to download or install anything. In conclusion, deploying your VR experience is a critical step in enabling users to enjoy your VR experience fully. Building your VR experience correctly and choosing the appropriate deployment option is crucial to ensuring that your VR experience runs smoothly on the user’s device. Whether you prefer direct device deployment, app stores, or webVR, Unity provides several deployment options, making it easy to deploy your VR experience to various devices and platforms.
Frequently Asked Questions Of How To Create A Virtual Reality Experience With Unity
Can You Make Vr In Unity?
Yes, you can make VR in Unity. Unity provides a platform to create virtual reality experiences, with support for various VR devices, advanced performance tools, and flexible graphics pipelines. Creating VR experiences in Unity involves setting up your project for VR development and installing the required tools and plugins.
How Do I Make My Own Vr Experience?
To create your own VR experience, you can use Unity, a popular game engine, and follow step-by-step tutorials available online. You’ll need to download Unity, configure the project settings, download XR Toolkit, create the VR rig, establish VR movement, pick up objects and test the app.
Additionally, you should have user personas, conceptual flows, wireframes, a VR prototype, and an interaction model in mind while designing your VR experience. Unity is an excellent choice for creating VR experiences, as it supports most popular VR systems, including Oculus Rift, Gear VR, Google Daydream, Cardboard, and Steam VR / HTC Vive.
Is Unity Good For Virtual Reality?
Yes, Unity is a good platform for virtual reality development. It is easy to use with the C# coding language, has multiplatform support, and works well with most popular VR systems including Oculus Rift, Gear VR, and Google Daydream. Unity also offers flexible graphics pipelines, advanced performance tools, and allows for the building of complex multiplayer experiences.
How Do I Create A Virtual World In Unity?
To create a virtual world in Unity, you need to set up your Unity project for VR development. Install Unity, create a Unity project, configure project settings, and download the Unity XR Toolkit. You can also watch several tutorials available on YouTube to learn the step-by-step process of creating a VR experience using Unity.
Conclusion
Creating a virtual reality experience with Unity might seem daunting at first, but with the right tools and resources, it can be a rewarding and exciting journey. Thanks to Unity’s multiplatform support and flexible graphics pipelines, you can achieve amazing graphics and build complex multiplayer experiences with advanced performance tools.
And with its C# coding language and compatibility with most popular VR systems, Unity is definitely a great engine for VR development. So, what are you waiting for? Start exploring the possibilities of virtual reality with Unity today!